Essence : A First Impressions

img_1628

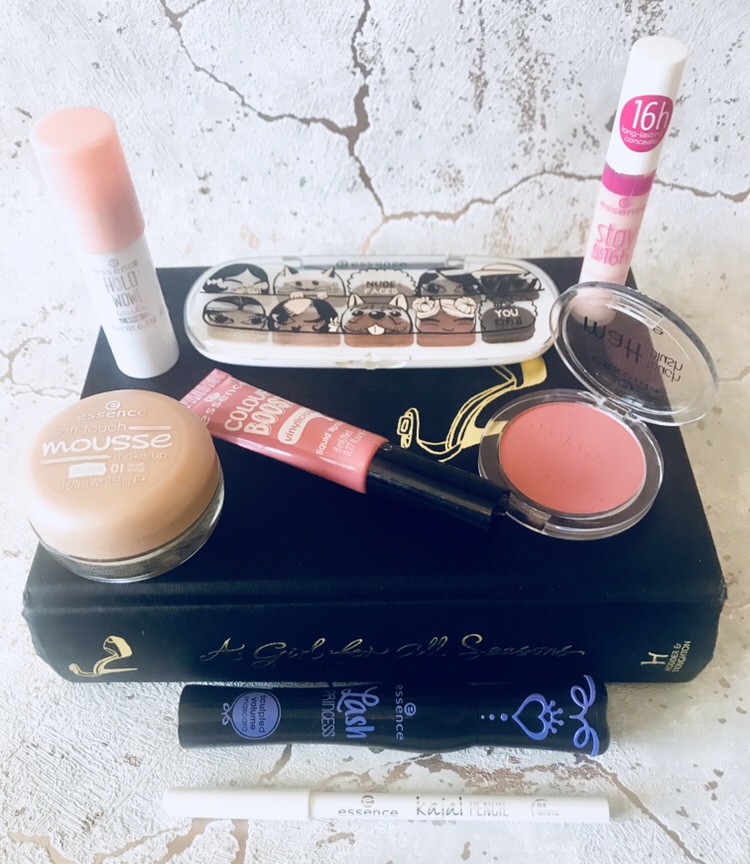
A recent trip to Wilko had me doing two things, one buying a lot of cute stationary and two taking a look at the essence make up range, buying a bulk of it to come home and engross myself in new products. I managed to get my hands on enough products to try a full face of Essence and here are my thought.

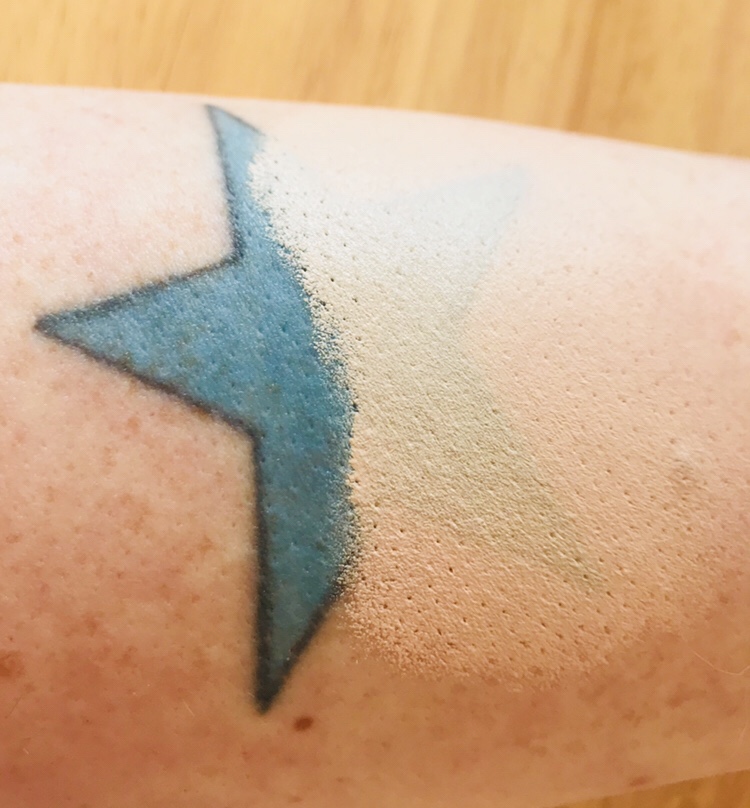
Essence soft touch mousse foundation £3.80

First thing to note is the shade range is minimal (there were only five at my local Wilko) Apart from this being completely the wrong shade the mousse texture is surprisingly nice, soft, smooth and applied well with my beauty blender. For me this is an very light coverage foundation which I would use on a “good skin day” and needed little coverage but a bit of a boost in glow. It struggled to cover pigmented areas of my skin and small blemishes but on clearer parts of my face it settled nicely.

Essence 16h long – lasting concealer £2.50

Again the shade range was not really as it should be since high street brands have really been upping their game with this recently.

Usually I apply my concealer around the areas of my face and blend afterwards but this was made slightly difficult as the formula dries quickly. Blending really became a task, the more I blended the more patchy it became and I was left with the areas where it had dried being more highlighted then others.

Essence Nude Faces eye shadow palette £4.00

img_1631

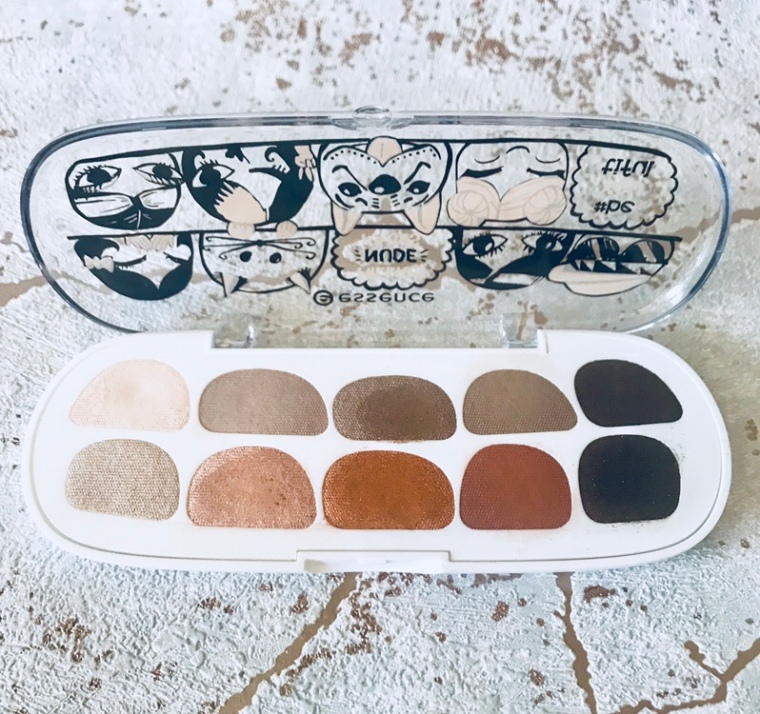
Inside are ten nude shades, five being matte and the other five metallic which for £4 is very reasonable.

Usage wise I found the eye shadows hard work! The mattes are very dusty and due to this have little colour payoff so you really have to build and blend up the colour which took a lot of time and effort. The metallic’s worked a lot better, although the formula was a lot more oily then other metallic’s I’ve used I didn’t have to work as hard as with the matte shades. Having the metallic shades available in the palette was how I held my eye look for the day together and made it a bit more bearable (Sorry).

Essence Lash Princess mascara £3.00

Before buying I had heard good things about Essence mascara and was hoping I’d love it.

The lash princess said to give lashes “sculpted volume” with a fanned out edge.

The applicator is curved which helped to grab and lift my lashes in one easy swoop and from root to tip. The wand was not saturated with product when I removed it which made coating even and not in the slightest bit clumpy. I really liked this mascara as I felt my lashes were given the boost they needed without being needing to curl, the dark colour and lack of clumping gave my lashes the illusion of great length. I was happy with how they turned out.

Essence Kajal pencil (£1.00)

I have been needing a white eyeliner and at £1.00 this is just what I was looking for. The colour is nice, the pencil is easy to use, soft, ensuring it glides on. It stayed on my waterline for a lot longer then I expected. Overall I will be continuing to use the pencil and I would even buy more in other shades.

Essence Matt Touch Blush £1.00

Has a nice range of colours available (the colour shown is 20 – berry me up), as with the matte eye shadows this does apply chalky and there will be a lot of dust. I also thought the colour was a lot brighter when applied to how it appeared in the pan which took me by surprise. Not one of my favourites or something I will be using again it was just to messy for a colour that I was not expecting.

Essence Holo Wow! stick £3.50

img_1632

Even as I write this I cannot make my mind up as to whether I love or hate this highlighting stick!

It’s a cream based highlighter with pink coloured undertones which glides on and blends out effortlessly whilst giving you an unbelievable reflective glow. I really, really like the effect but I can’t help feeling like I’ve crawled out of my eight year old niece’s make up box and transformed into a unicorn. It is safe to say I am just to old to use this product without looking like I am trying really hard to be current.

Essence Colour Boost liquid lipstick £2.80

img_1633

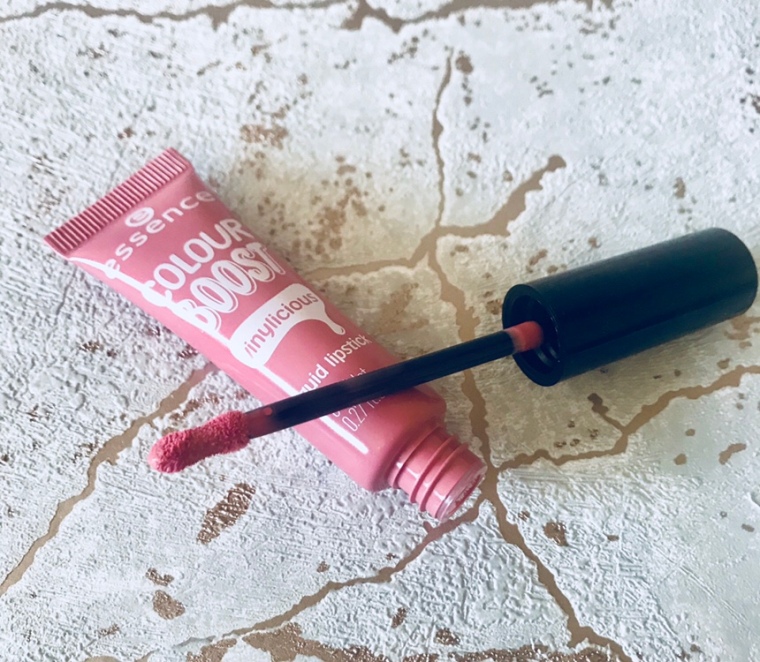
The liquid lip formula is thick and sticky, the colour is pretty but it applies streaky. As this is a vinyl effect the liquid does not dry down and therefore continuously has to be reapplied after eating and drinking etc. A little to high maintenance for me.

It is safe to say Essence has not really worked out for me although I will be holding on to the mascara and eyeliner I will be gifting the other items to my niece as she will love all the glitter and I think they are great products for her to start out with.

Let me know your thoughts on the Essence brand, have you found anything that works great for you? I’d love to know if anyone’s experience has been different to mine.

Next post will be Friday.

Kate x

Can Lipstick Make You Happy? – The 5 Day Trial

img_1614

Coco Chanel once said “If your sad, add more lipstick and attack”

With this in mind I’ve set about wearing five different lipsticks throughout the week to see if it added to my all round sassy nature and could give me a boost in mood.

Monday – I start the week as I mean to go on with the YSL rouge volupte shine in number 4 (£28) which is a red. Unlike a lot of my bold in your face reds, this shade is very subtle its formula is so light and creamy it puts me in mind of a lip balm. This allows the colour to be very versatile as you can use it for a light splash of colour for a day look or it can be blotted and built up into a bolder night glam. The Packaging is one of the most glamorous lipsticks I own and these are great for dressing table display.

Mood Enhancing? – Yes I felt good about myself throughout the day and due to the pretty packaging re-applying the lipstick made me feel like I was having a special treat.

Tuesday – Due to the success of yesterday I decided to do a full face of make up today which allowed me to go a bit OTT with my lipstick choice. The chosen one is the Smashbox always on liquid lip in Chill Zone (£19.00) and the colour is a “go big or go home” bold grey. I chose this as I love the Smashbox formula, their applicator is really easy to use which for me is essential when using loud colours. When first applied this does feel slightly sticky and takes a little longer to dry down but once this is set I can promise you it’s good to go all day.

Mood Enhancing? – I think Coco may have been on to something, after feeling good about myself the Monday I’ve now advanced to a full face and a dramatic lip whilst feeling I can crush the balls of anyone who crosses me.

Wednesday – As a lover of Mean Girls I’ve stuck to the on Wednesday’s we wear pink moto and gone with the Ofra long lasting liquid lipstick in Bel Air (£11.00), a pink nude that is the most complimentary nude lip for my pale skin tone. Ofra has a really soft formula that glides on and feels so comfortable to apply, the liquid lip sets in about a minute and can feel a little drying to the lips. Throughout the day this did need reapplying although due to the shade being such a nice match to my skin tone this didn’t bother me to much.

Mood Enhancing? – I went for an all over more subtle look today but still felt pretty and put together, apart from one or two reapplications I liked being this low maintenance yet still feeling confident enough if I was to bump into someone I know I wasn’t going to run and hide.

Thursday – When playing with lipsticks I have a go to dramatic look I always love to do using M.A.C smoked purple (£17.50), after two days of liquid lipsticks it’s safe to say my lips need a rest and this is a bit kinder for them. The deep berry colour adds a bit more dimension then going for a solid black. As always with M.A.C lipsticks this is soft, creamy and glides on with strong colour pay off and a matte finish. Smoked purple gives the effects of a liquid lip without drying your lips out (this does need reapplying throughout the day, after eating/drink etc.).

Mood Enhancing? – When wearing this lipstick I get really nostalgic, it reminds me of loads of good times (my brothers wedding, date night at a very nice restaurant with my husband and so on). I can’t help but feel good when I wear this.

Friday – For the last day I have used one of my favourite liquid lipstick formulas and that would be Jeffree Star velour liquid lip in I’m Shook (£16.00). I’m unsure if this particular shade is still available as I believe it was limited addition but there is a vast range of colours available from this brand. I need to purchase more of these as for a liquid lipstick they are the best, soft and smooth, quick setting and colour that does not budge. The velour liquid lip is also one of the only liquid lip where I don’t get transfer onto a glass or smudging, it is my one true love lipstick wise.

Mood Enhancing? – This is lipstick you can take on the world with! I felt happy and confident throughout the day and when you think it takes a minute or two to apply it’s all worth it.

Throughout the week I have really reignited what make up means to me and learnt that it can be an instant pick me up when your feeling a bit down or frustrated. I have also found that I use make up especially lipstick to show off my personality, one day I want to be bold and eye catching, others I want to be more natural and demure. I use make up for myself and to make myself feel good, as long as you are having fun you can cake and bake as much as you want whilst ruling your own world in heels, trainers or flats (whichever you prefer).

This has been a really interesting week discovering what make up does for me, Do you ever use make up as a mood booster? What are your favourite go to products that give instant thrills? Let me know in the comments below or on twitter @katesbeautyhome as I would love to hear your thoughts.

Hope you enjoyed this post as always the next one will be on Tuesday.

Kate x

Beauteque Monthly – The Subscription Box With A Bit Of Everything

img_1605

Over the last year or so I have been wanting to get a monthly subscription box but when looking into it I have become overwhelmed and spoilt for choice. They can come in very expensive sometime for only a few sample sized products.

I really wanted something more!

Recognising the struggle my sister in-law SJ (Her Instagram is @sjmorgan89 if you want cute pics of skincare and makeup) came to the rescue. She is a massive fan of Korean skincare, has great skin herself and is generally a woman in the know about everything. SJ suggested I take a look at the Beauteque monthly website as they offer different types of subscription boxes depending on what you are looking for. One being the ‘mask maven’ box for $13.00 / £9.90 a month and the other being their ‘beauty box’ for $22.00 / £16.75 per month with no twelve month contract and being able to cancel whenever you wanted.

Knowing I was going off a good recommendation I took the plunge and ordered the beauty box, I am currently going into my third month of receiving these goodies and have never looked back.

Each month is based around a theme (July’s being Deep Detox), inside your box are six full sized products that are relevant to the theme and can range from skincare, make up to nail polish and sleep masks. All the products are available as separates on the Beauteque website so if you find something you really love it is so easy to restock.

The Deep Detox box consisted of :

Jayeon Bamboo Charcoal Konjac Sponge ($5.99 / £4.56) – When you first remove this sponge feels like a rock but once you leave to stand in water it puffs out and becomes a great exfoliating product. Due to the infusion of charcoal it really does help give your skin and intense clean whilst still being gentle and non abrasive.

Farm Stay Charcoal Pure Cleansing Foam ($11.99 / $9.13) 180ml – Use this with the sponge to achieve a deep clean. I have spot prone skin and when I first started using this cleanser I did get a breakout due to the detoxifying properties in the formula but after a few days this cleared up and my skin has stayed incredibly clear and blackhead free since.

Baviphat Urban Dollkiss Carbonated Charcoal Clay Mask ($20.00 / £15.23) 100ml – I have really enjoyed this mask. The tub is huge and you really do not need a lot of product for application as the clay is quite thick. It comes with a small spatula to apply and as it develops on the skin it is very fun watching it bubble. The mask gave my skin a radiance and left it feeling very clean and clear.

Purederm Charcoal Design Nose Pore Strips ($5.99 / £4.56) six strips – I can’t go into to much detail about these as I haven’t had the time to use them. I can say they remind me a lot like the traditional nose strips only are larger in size so they cover a bigger surface area of the nose and surrounding cheek. They do have a pretty design on the strip which makes them nice to look at and has me dying to try them so hopefully I will get the time soon.

Vacci Royal Luminant Auto Eyebrow Pencil ($8.99 / £6.85) full sized – One end is the eyebrow pencil and to the other is a spoolie both with lids so good for travelling. The barrel of the pencil is a lot thicker to other brow pencils I have and made application surprisingly easier, the colour was a little lighter then I would normally choose but blended well. The pencil is very soft and you don’t have to be firm to build up colour. The eye pencil was a nice little make up token in the skincare based set.

Siero Surface Moisture Mask Pack ($4.99 / £3.80) – Each month you get a sheet mask pack which comes with three elements this particular one comes with a peeling gel, a vitamin booster and then the sheet mask itself. The three step masks’ have become a favourite at home treatment for me. It’s a quick and easy way to gain the luxury “at a spa” feel whilst helping the skin to regain lost moisture and giving it some TLC.

Three months in and I still look forward to what is going to be in my latest Beauteque box. I love that every product is full sized, due to this you really have the chance to try out and make sure it is working for you before committing to buying. The different themes each month add to the excitement as you are never sure what you are going to get but know that each product will be used. I am so glad SJ gave me the heads up with this subscription box as they are really enjoyable and the perfect thing I was looking for.

Do you have a subscription box you love? Are you completely and utterly overwhelmed when trying to find the right one for you? (there are so many out there now) Let me know your thought on where you stand with subscription boxes in the comments below or on Twitter @Katesbeautyhome.

Hope you have enjoyed this post, the next will be up Friday.

Kate x

The Morphe Dare To Create 39A Is Back : Hot or Not? Review

img_1550

The Morphe 39A Dare to Create palette (£34) is back after being released as a limited edition last Christmas and with them now opening a store in London plus having a U.K based website it has never been so easy to purchase for us Brits. Not to mention this also means getting their latest releases and collaboration items the same time as the U.S.

For £34 pounds this palette contains 39 shadows so you are paying less then £1 per one, built up of seven large pan transition shades (these can also be used for contouring), eighteen mattes in various colours and fourteen shimmer/ metallic ranging from blues, greens, gold and pinks. For the price this is one large, hefty palette.

With all the colours you are also getting the new re – branded packaging which is a very sleek and stylish logo and a cardboard outer casing. It looks very nice compared to the cheaper plastic ones they had a year ago. The pans are also protected with the clear plastic covers that come in many eyes shadow palettes but what Morphe have done different then before is to place the shade names on this. I think this is a great addition as Morphe do sell individual shadows so if you hit pan on a particular shadow in the 39A you now know the name of it to purchase a new one.

I love how Morphe shadows perform! The 39A puts me in mind of the palette they collaborated on with Jaclyn Hill (performance wise). As with her palette the shadows themselves give a strong colour, even from lightly coating the brush whilst creating little to no mess. Their texture is soft and creamy not dry or flaky which makes them very easy to blend even if you were a complete novice to eye shadow.

If you are a beginner and looking for a brand that is reasonably priced but not lacking in quality, I would really give the Morphe website a look as they have loads available and their brush have become my go to.

There are many ways to create different looks with this palette due to your colour choice. The palette is laid out into sections with the seven larger pans along the centre row to build up the start of your eye look. To the top left are the brown colours where you could create a smokey eye or even a light understated day look. The top right holds purples, pinks, and reds whilst bottom left is many different shades of blues, leaving the bottom right for the greens and an always needed black. There is definitely enough choice to create a bold look and have you feeling glamorous.

For me this palette is a great investment for the Autumn / Winter months when all the party invites come out in force and you need a make up look that is going to make you feel your best. The shimmer shades just scream festivities so it would be easy to make your eyes the main event of your look during the Christmas period.

Overall I do really like the 39A and think it is great value for money due to the pure size of the palette and the quality of shadow you are receiving. I really enjoy using the Morphe brand in general and this is up there with my much loved Jaclyn Hill palette. I am now waiting patiently for the vault which is said to be released on August 14th.

Let me know your thoughts and feelings on the 39A. Did you buy it first time round? or considering getting it now? (spoil yourself!) Do you like Morphe as a brand and what do you think of their new look? Comment down below or find me on Twitter @Katesbeautyhome.

Until Tuesday,

Kate x

Links

39A DARE TO CREATE ARTISTRY PALETTE

7 Step Skincare Routine – Giving Me A Smiley Face

img_1544

I have recently learnt a lot about skincare through reading various books and researching online and gone are the days of just cleanse, tone and moisturise. In replacement is a seven step skincare routine both day and night that takes me a maximum of ten minutes and has left my skin the best it has ever been. Since starting this routine my breakouts have dramatically lessened and my skin is healthier and clearer to the point where I actually go outside without make up on and don’t worry about how my skin looks.

Today I’m going to be talking the steps I take, the products I use and how they help my skin.

Step One : I use an oil based cleanser to start as this is great for removing all traces of dirt from the face and really breaks down make up to leave you feeling clean. My current favourite is the Simple Kind to skin hydrating cleansing oil (£6.99) as it is designed for sensitive skin and contains pure grape seed oil which can help prevent blemishes without clogging pores.

Step Two – It is time to re – cleanse, using the Garnier skin active cleansing milk (£3.49) I re wash my face making sure all traces of oil or left over build up of dirt are removed. I use a cleansing milk as for me this is much gentler to the skin and less drying. I suffer with a lot of redness and sometimes inflammation so with the Garnier cleanser having added rose water this helps to prevent and lessen these two problems.

Step Three – I use two facial pads to apply toner as this is the least messy way and I love how refreshing and instantly moisturising a toner is for my skin. My go to toner at the moment is the Esfolio sea grape marine water toner ($18.99 / £14.45). Sea grape (not to be confused with grape seed) helps to maintain a youthful appearance and have a natural collagen which can only be a benefit for my skin.

Step Four  – Previously I have struggled with serum and finding the right one for my skin type. I often find them very thick and pore blocking. After a recommendation from my sister in – law I have changed to the It’s Skin power 10 formula (£13.00) and it has changed my view on serums altogether. It’s a lovely water based formula that applies easily to the skin, giving instant hydration and an all round softness. I went for the VB effector as this helps restore skins natural PH balance so can also help with the reduction of redness, but they have many other types available to different skin needs.

Step Five – Medi flower collagen wrinkle eye cream ($5.99 / £4.58) has been my holy grail of eye creams, it has a light texture which is easy to apply, no stinging to my eyes and the added collagen helps firm the skin. I also find this very moisturising leaving my under eye hydrated and comfortable all day long.

Step Six – A lightweight moisturiser with added SPF as “protection is the best form of prevention” and I want to keep my face as smooth as I can for as long as possible. I am currently using Simple protecting light moisturiser with SPF 15 (£4.29) as I like to feel hydrated by my moisturiser but for it not to feel heavy or greasy on. This gives me just that and with the added SPF for under five pound it’s a product I’ve really come to like.

Step Seven – The final step I take is to use another moisturiser that focuses on hydration of the skin. I do not use this straight after the previous one but throughout the day if my skin is feeling slightly dry in places. I have just hit pan on my A’Pieu Aqua nature clouding cream ($13.99 / £10.65) and will be purchasing another as for me this has really helped to hydrate my skin though out the day whilst helping to improve the clarity of my skin.

As i said at the beginning this routine takes me around 7 – 10 minutes to complete and is really worth the efforts as I cannot explain how much clearer my skin has become since sticking to a more in depth system. To add to this I do treat my skin to a facial mask twice a week, one being a detox mask and one being heavy on hydration.

Let me know in the comments what your go to routine is and what skincare products you can’t live without. Do you manage to stick to a morning and evening routine? What are your favourite parts of your routine? (mine would be serum, I love how my skin feels after it’s been applied). As always you can find me on twitter @Katesbeautyhome if you fancy chatting beauty products.

Next post shall be on Friday so until then I hope you enjoyed reading.

Kate x

Links

Simple hydrating cleansing oil – https://www.superdrug.com/Simple/Simple-Kind-To-Skin-Hydrating-Cleansing-Oil-125ml/p/709201?gclid=EAIaIQobChMI4faCjJe13AIVwbHtCh0fng1YEAQYASABEgJh2PD_BwE&gclsrc=aw.ds&dclid=CPSgkpGXtdwCFe0W0wodmE8NwQ

Garnier skin active cleansing milk – https://www.boots.com/garnier-skinactive-naturals–rose-milk-cleanser-200ml-10229295p?cm_mmc=bmm-_-Google+Boots+PLAs-_-BAU-_-C=%28GB%3AWhoop%21%29+Boots+Shopping+-+Category+-+Beauty+-+Desktop_%28GB%3AWhoop%21%29+Garnier&gclid=EAIaIQobChMIt6OOjpm13AIVTM-yCh3FLgvZEAYYAyABEgKo3PD_BwE&gclsrc=aw.ds

Esfolio sea grape marine water toner – https://www.beauteque.com/esfolio-marine-water-daily-toner/

It’s skin power 10 formula –  https://www.beautybay.com/skincare/itsskin/itsskinpower10formulavbeffector/

Medi flower collagen wrinkle eye cream – https://www.beauteque.com/medi-flower-collagen-eye-cream/

Simple protecting light moisturiser – https://www.boots.com/simple-kind-to-skin-hydrating-light-moisturiser-125ml-10023879?cm_mmc=bmm-_-Google+Boots+PLAs-_-BAU-_-C=%28GB%3AWhoop%21%29+Boots+Shopping+-+Category+-+Toiletries+-+Desktop_%28GB%3AWhoop%21%29+Simple&gclid=EAIaIQobChMIhYyzhKK13AIVDRQbCh3ALQsiEAkYBCABEgLQkfD_BwE&gclsrc=aw.ds

A’Pieu aqua nature clouding cream – https://www.beauteque.com/apieu-aqua-nature-dewdrop-clouding-cream-50ml/


The Good, The bad and the Really Good! Latest Revolution Spree

img_1532

A couple of months ago I popped into Superdrug and accidentally drop a bomb of money on a few Revolution products. Having never used the brand before I bought a range of products to test out as I wanted to really see if there was something I liked as their prices are so affordable.

I’m going to start with the product everyone has raved about recently and that is the Conceal and Define concealer. The basics are, it is £4.00 for 4 grams/ 0.14 fl oz and has a large shade range of 16 colours available (if you can get your hands on them). The shade I purchased was C2 which is not as light as I normally go for but C1 was out of stock. There is a lot of hype around this stating it rivals the Tarte shape tape which will cost you £22.00.

I’ve been using this for a few weeks and it has become my favourite concealer, the coverage is amazing. I can wake up with the darkest of circles under my eyes and feel confident that this product will cover them with no trouble. The consistency is lightweight, it blends like a dream without lifting the foundation underneath and once set with powder will last throughout the day. I’ve also used this for a cut crease as the coverage is there and its very easy to apply/blend. For £4.00 it’s a total must have.

Another product in my over flowing basket was the Soph x ultra eye shadow palette (this is the first release as I now know she has creates another palette with revolution that has recently gone on sale). For £10.00 it has twenty for shade with colours ranging from neutrals, a few warm shades and a good few foils. To look at I do like the setup of the palette and feel you have the option to create many looks with the colours available.

The shadows have a nice texture that blends well although the neutrals I did have to build up to get desired effect as they were very light on my skin. In comparison the brighter shades need little building as the colours are very strong. The foils were not as bold as I would have liked, they definitely perform better when using a wet brush or your finger but I would have liked more pop!! I think this is on the right price point, not one of my favourite palettes but you can get a good look and due to it size it was the only palette I took on holidays.

As we are currently talking palettes I also bought the Blush Goddess palette because you know.. I am one (a goddess that is not a blush). This contains eight shades two peach toned blushes and two pink toned blushes with four highlight colours along the top row all for £6.00.

I have used this a couple of times and again it is not one of my favourites. The blush colours are very subtle which I don’t mind to much as I do prefer to build my blush rather than look like I’ve been attacked with Krusty the Clowns’ make up gun. The blush does sit on the skin well, the colours are nice looking and I was able to blend them well, I am just against the powder flying everywhere when you dip the brush in the pan. It’s not awful though and I will be using these blush shades again.

The four highlighter shades are lovely to look at in the pan but didn’t do much for me. The first two colours when used I find hard to tell any difference between them (I think one has a more purple undertone). and the other two are just not for my skin type. As with the blush I think they may have gone a bit OTT with the talc because you will go up in a puff of smoke when you use these minus the genie three wishes. Due to their texture I didn’t like the way the highlight was on my skin it added texture and that is not something I wish to be highlighting.

In comparison the liquid highlighter is something I have fallen in love with! I purchased the Champagne colour and it really is complimentary to my fair skin tone. The applicator is a pipette and one drop is enough to have you golden so the 1.8ml will last ages. This colour is particularly reflective, giving a nice glow that can be subtle or built up to shining beacon.

Due to this being so easy to apply and blend onto the skin it has made me think about just using a liquid highlighter for the foreseeable. At just £6.00 this is up there with the concealer, being an item I now use whenever I do my make up routine.

My last two products I bought were complete impulse buys, the retro luxe matte lip kit in Grandee (£6.00) because you can never have enough lip kits in your life and the luxury powder in banana (£5.00).

The Lip kit I have no complaints with although I cannot comment on the lip pencil as for some reason there wasn’t one present in the box.

Check your boxes before purchase people.

The liquid lipstick has an easy to use applicator which dispenses the colour to lips evenly and without being streaky. The dry down time is around one minute and it’s texture once dry is alike to many other matte liquid lips. It is not sticky in any way but will need reapplying throughout the day once eaten or drinking. Over all this is a nice matte liquid lip for £6.00 it does what it needs to and looks pretty when applied. When I need to be a bit tighter with my make up funds I would purchase some more colours.

Moving on to my second impulse buy the luxury powder in Banana, I could not tell you why I even bought this. Before even purchasing this I know Banana powders are to yellow for me and make make me look like I’ve been projectile vomiting for a week so this is entirely the wrong shade. I may have lost my mind with this one, when I open my make up drawer and see it I shake my head and ask myself, “What in the hell did I do!”

Usage wise it is a screw top and the only place to put your product when using is in the screw top so a big mess follows wherever this powder goes. The product applies well and is ideal for baking and catching eye shadow fall out. It brushes away easily and leaves a light veil of powder that would add nicely to concealer highlight if it was the correct shade. Throughout the day I do feel like this did build up in my pores ever so slightly and made them even more visible so it won’t be going down on my hit list or must haves but if you only needed your make up to last about three or four hours this could help with oil control.

To sum up the conceal and define is a holy grail and not to be ignored, the liquid highlighter is another favourite of mine and is great if you really want to glow your face up. The soph x eye shadow palette is a good option for the price range and has a lot of looks available from the colours, I will also be purchasing a few more colours in their retro luxe matte lip kit collection as again for the price they are worth it. Massive no’s have been the luxury powder and the blush palette as they are just to messy for me to deal with.

What are your thoughts and feelings on Revolution? I love a good high street brand but often find they can be hit or miss with certain items. Have you tried any of their other products not mentioned that I need to add to my drawers? Let me know in the comment section below. I also spend a lot of my days on twitter talking life, make up  and beauty so you can also find me there @Katesbeautyhome.

All products mentioned are linked down below.

Next post will be Friday.

Kate x

Links

Revolution Conceal and Define  – https://www.superdrug.com/Make-Up/Face/Concealer/Revolution-Conceal-and-Define-Concealer-C2/p/751533

Revolution Sophx Palette – https://www.superdrug.com/Make-Up/Eye-Makeup/Eye-Shadow/Revolution-Soph-X-Eyeshadow-Palette/p/743038?gclid=EAIaIQobChMI-uTO482j3AIV1IbVCh2NgwhpEAkYASABEgKwlvD_BwE&gclsrc=aw.ds&dclid=CIjYgOnNo9wCFWgD0wod_CgNVA

Revolution Liquid Highlighter  – https://www.superdrug.com/Makeup-Revolution-Liquid-Highlighters/Revolution-Liquid-Highlighter-Champagne/p/741511

Revolution Blush Palette – https://www.superdrug.com/B-Blusher-and-Bronzer/Revolution-Blush-Palette-Blush-Goddess/p/704808

Revolution Luxury Powder – https://www.superdrug.com/B-Contouring-and-Highlighting/Revolution-Luxury-Banana-Powder/p/716130

Revolution Matte lip kit  – https://www.superdrug.com/Makeup-Revolution-Retro-Luxe-Lip-Kits-Matte/Revolution-Retro-Luxe-Lip-Kits-Matte-Grandee/p/716634

Tarte Shape Tape – https://tartecosmetics.com/EU/en_GB/makeup/face/concealer/shape-tape-contour-concealer/836.html?gclid=EAIaIQobChMIoKm3wsmj3AIVb7vtCh0sXgG0EAAYASAAEgJ5oPD_BwE&gclsrc=aw.ds

Maybelline Tattoo Brow a must have in any brow addicts tool kit

After watching the advert for Maybelline’s Tattoo Brow I have been dying to try it but always got the fear of becoming Charlie Simpson from Busted (if you are to young to remember these I suggest you YouTube “year 3000” that’s my jam). When going on one of my many shopping sprees for new make up I finally purchased it on total impulse, here is what happened.

Product wise the Maybelline Tattoo brow will cost you £12.99 for 4.6 grams, the colour I have is medium brown but I believe it is available in three shades. Inside you get the product and instructions can be found on the side of the box. The dye can last up to three days and when I spend so much on brow tints I think this could be a great option.

When I said this was a brave impulse buy it becomes even more relevant when you open the product and see the brush you have to apply this with. For some reason I thought it would be an angled brush that would help with precision and even application but it is actually flat ended and saturated in a thick blackish liquid that resembles tar. The phrase “What the hell am I doing?” and “This could go horribly wrong!” spring to mind but on I go praying for the eyebrows of Cara Delevingne.

To begin I pluck away stray hairs and call upon my Anastasia brow stencils to lightly draw out the shape I wish to achieve (I am rubbish at drawing them on free hand, honestly I give myself a uni – brow). Once all this is done it is time to APPLY THE PRODUCT!!

Upon opening the tint itself does have a smell of dye but that is to be expected, it is not overpowering and personally I quite like the smell.

A word of advice if you are worried about a reaction to the product you can do a test on your arm or hand before using. The box does not state that you need to do this but as it is a dye and I’m a person that can have breakouts from certain products I did do this.

The flat edged brush that I was so worried about using earlier is surprisingly easy to use. The tint is quite thick and appears to grip the hairs as you use the brush so this helps with accuracy. It is not as messy as I thought and in all honesty I was able to get the shape I wanted in a matter of minutes without making mistakes.

Although the tint is thick in texture I did need to re – dip the brush in product a few times per eyebrow as you do need to ensure the layer is thick enough to peel off later.

The tint dries down quickly and is very lightweight, it doesn’t go hard or flaky like a face mask would so you are able to move and make expressions if you need to. This comes in very handy when your husband compares your new brows to Borat’s moustache.

Now we wait. In order to achieve a three day tint the product has to stay on for two hours so I suggest you catch up on your latest TV series, read a book or start writing your next blog post as it going to be a while. I don’t suggest you drink a bottle and a half of wine and forget you even put the product on, you will be guaranteed to get some strange looks the next day and Cara Delevingne you are not!

Anyway after a full two hours it is time to grab a pair of tweezers and gently peel away the tint for the big reveal of my new brows. I for one am more then anxious (I have the school run in the morning and do not wish to wear plasters over my brows).

Removal is extremely easy, The tweezers can successfully grasp the product from the inner corner of the brows and gently pull the product away without pulling any hairs or leaving and residue. I did get a little bit left under the brow but I removed this with a damp cotton bud and that did the trick.

The reveal has me amazed. I don’t know why I was so worried as the overall effect is a very natural and defined brow. The shape has stayed exactly as I wanted and my sparse hairs appear thicker and less bald. They really do look like I have had them done at my salon. The colour is no where near as dark as the tint you apply which I am thankful, it really does blend in well with my natural brow colour.

As the days go on the tint has lasted well, I’d say about for days before is completely gone. During this time I have used a oil based and milk based cleanser plus numerous other skincare products without worrying about if it’s getting in my brows. The colour also breaks down evenly, there were no extreme patches where it had come away in one area and was still in others.

The Maybelline brow tint is something I will be re- purchasing, I have already used it again after my first experience and gained the same results. It is just so easy to use and really does help out when you’ve been to busy to get to your latest eyebrow appointment.

Let me know your thoughts and feelings on this, have you tried this brow tint or others similar? Have you had fear of using it in case it goes horribly wrong? Give me a comment down below and I will get back to you or you can find me on twitter @Katesbeautyhome as this is where I spend most of my life. Links are below for both the brow tint and the brow stencils.

Bye for now.

Kate x x

Links

Maybelline Tattoo Brow : https://www.superdrug.com/Maybelline/Maybelline-Tattoo-Gel-Eyebrow-Tint-Peel-Light-Brown/p/739515?gclid=EAIaIQobChMIl7bV2K6a3AIV9zLTCh1ObgqkEAYYASABEgJC_PD_BwE&gclsrc=aw.ds&dclid=CPGZ4oPDmtwCFYhi0wod9eAEeA

Anastasia Brow Stencils (currently on sale at Beauty Bay) :  https://www.beautybay.com/makeup/anastasiabeverlyhills/eyebrowstencils/?ctyid=gb&gclid=EAIaIQobChMIvPuGqMOa3AIVAzwbCh1TxwzmEAQYASABEgKBuPD_BwE

Glam Glow Power Ranger Edition, a bit of nostalgia or packing a punch?

One of my most recent purchases has been the Glam Glow Goldar mask from their limited edition Power Ranger theme. I have been dying to try Glam Glow products for ages but I’ll be honest their pricing has always put me off as I haven’t wanted to spend that much on a face mask I’m unsure is going to work for me. Luckily I found this one in the cosmetic shop at the McArthur Glen retail park for a slightly cheaper £18.00 which for me was more bearable price.

Once home I couldn’t wait to try it out and here are my first impressions:

Inside the box you get the Goldar mask which weighs in at 30 grams, my guessing this would be about three applications tops as it is a peel off mask so you do have to build quite a thick layer of product to enable easy peeling. You are also given a sample of Glam Glow’s mud mask that I am yet to try, plus a set of instructions stating to apply to clean dry face, 20/30 mins and peel off. This particular mask is meant be “tightening and toning, making the skin firmer and more defined”. So far so good.

Upon opening and applying the mask it went a bit down hill for me. The mask itself is gold in colour which looks cute and is fun when terrorising your husband singing “Hey Gold member” for the next thirty minutes (honestly I did not do this!!) but there were to many things I just didn’t like about this.

Firstly the formula itself has a very strong scent that was quite chemically and I found it rather unpleasant. I will note as the product dries down the smell does lessen and is no where near as harsh as when first applied but the initial attack on my nostrils was just to much for me to get over.

During application the mask also gave my face a tingling sensation which I did not feel comfortable about. I wouldn’t say it stung and I didn’t have fear of taking it off and being Freddie Kruger but it was again something I found unpleasant. As with the smell the sensation does settle down as the product dries.

So far with twenty to thirty minutes to go before removal, the only thing I am liking is that I have a gold face and feel I may actually be the world cup (well the ball on the top anyway).

Once dry removal is surprisingly easy. I would go as far as to say it was the easiest peel off mask I’ve ever removed, there is no sticky residue and it peels away in one whole piece leaving little to no excess on the skin.

The mask itself seems to dry like a latex material which is quite hard to break up unless using your nails. My reasons for mentioning this is all other peel offs I have used seem to be rather thin and break easily when removing making it harder to get every bit off the skin and therefore making it more of a hassle to remove. I like that this is not the case with the Glam Glow mask.

As I said at the beginning of this journey the Goldar mask promises tightening and firming to the skin, how does this weigh up?

To look at, honestly my skin does not look any different as far as being more defined and lifted, I’m not all of a sudden Love Island’s Megan (but that would be unrealistic now wouldn’t it).

To touch my skin is tighter, feels a lot firmer and considering this mask was not a hydration mask my skin is surprisingly soft.

Overall would I buy this product again?

Sorry but it’s a No from me. The usual retail price for 30g of Goldar mask is £24.00 and for three applications when the box states best results are achieved when using the mask at least twice a week I just find it not worth the money. The mask does live up to some of the claims and my skin did feel good after usage. The colour was fun and removal was extremely easy with little to no mess. In all honest if I am going to spend this amount on a face mask I would rather have one that I live for then one I think is mediocre. I will be trying out the Glam Glow mud mask sample included just to see if I gain a different experience from the brand and find something I love.

Let Me know in the comments section if you have any Glam Glow products you love that I could try out or even if you’ve have a different view on this particular one then I do. Do you have any other brands in the same price bracket that I should try?

You can also give me suggestions on twitter @Katesbeautyhome as this is where I am most active.

Hope you enjoyed this little first impressions the mask is available at the link below and is currently on sale at feelunique.com for £18.00 (no this is not an Ad but literally the cheapest place to buy it online if you were interested).

Thank you

Kate

Links

https://www.feelunique.com/p/GLAMGLOW-GRAVITYMUD-Firming-Treatment-30g-Gold-Power-Rangers-Edition?gclid=EAIaIQobChMI_6DLi6uQ3AIVDDwbCh2g8gnHEAkYASABEgLh-fD_BwE&gclsrc=aw.ds

Money’s tight . . . It’s OK pamper yourself

We’ve all been there, it’s mid month there is another two weeks until pay day and the bank account is pretty bleak to say the least. There seems to be new products coming out left right and centre and sometimes money just will not stretch far enough for the little luxury product we’ve had our eye on, so in honour of our poor times I’ve looked up and tried some DIY skincare that are easy to achieve at home and cheap as chips to make (all sites used for ingredients are linked below).

img_1173

I’ll start with a mint lip scrub that promises to exfoliate, nourish and most importantly for me plump up your lips.

You will need to find in your kitchen:

20g of brown sugar

20ml of olive oil

2-3 drops of peppermint oil (I got mine for 99p off amazon).

Mix them all together and you have yourself a home made lip scrub with the added satisfaction of making it yourself.

Honestly it’s not a very good looking scrub but the strong scent of peppermint mean your going to smell like a polo after use so it has its perks.

The scrub itself is very gentle whilst still giving you the exfoliation needed for smooth lips. It made mine feel a lot softer and the olive oil gave added moisture without leaving my lips greasy.

Plumping wise this was a let down, there was no tingling sensation or any change in the way my lips looked. I also used a lot more drops then the suggested three as I do like to go all out for a promise of fuller lips (without turning to the needle).

Overall the scrub works to exfoliate and gain smoother lips but if you wanted to achieve the plumping effect it may be best to try something else. This is cheap and easy to make and can be knocked up in about two minutes so if your looking for a quick, easy way to improve your lips when your strapped for cash this is effective.

Next up is a hand scrub that I found on a lovely little blog called living thenourishedlife. The author Elizabeth has many DIY recipes and other healthy tips for life. The homemade hand scrub promises soft hands and the things you will need are listed below.

1tbsp Coconut oil

2tbsp raw honey

1/4 cup of sea salt

1/4 cup of organic sugar

1tbsp of lemon juice

Once you’ve mixed them all together you have something that looks a lot better then the lip scrub, the smell is delicious, plus there is enough for around three applications depending on how generous you are with your usage and it can be kept in the fridge.

The scrub is very rich and thick, you can spend a good few minutes rubbing it into the skin without it being uncomfortable or harsh. I found the more you scrubbed this into your hands the stronger the smell became which was very relaxing and satisfying.

Once washed off my hands felt incredible, they were so soft and smooth. All traces of dry skin had been removed and the coconut oil had left my hands so nourished and moisturised. You can literally wash your hands about thirty times afterwards and they will still feel so soft thanks to the coconut oil.

This is definitely one I will be making over and over again! It’s just so easy to achieve and it really works. I’m going to be using it on both my hands and feet next time.

Last on the list of DIY projects has been the cocoa dream hydration mask, which is said to give a healthy glow and was found on the marie claire website (ingredients listed below)

1/4 avacardo

1tbs cocoa powder

1tbs honey

The hydration mask took a few minutes to make and it reminds me of something that falls out of my dog after he’s eaten a bone and yet smells like warm homemade brownies. This being said beware the kids/animals/husband may lick it off your face!

Application wise this is difficult, I used a foundation brush and due to the masks texture it goes on clumpy, which then becomes streaky and patchy as you try to even out but once you’ve got there it is a comfortable mask that does not irritate as it dries down.

As with the application the removal is messy! The overall effects of the mask seem to have been good. My redness has been reduced and my skin feels soft so I can see how over a period of use how this would give skin a glow.

Hydration wise I did not feel like there were any benefits. I would actually advise using a moisturiser straight after washing off as my skin felt very dry and tight.

Due to the reduction in the redness of my skin (I do get a lot of redness) I would try this again as it’s quick, cheap and easy without causing to much irritation. I will however have the moisturiser on standby for after removal.

So my DIY experience has been a bit hit and miss. All the products I have tried worked to a certain extent (the hand scrub being my favourite and most successful). I think it’s a great idea for poorer times to give yourself a little TLC and each product was so easy and quick to make plus there are so many more ideas available online you could try many different ones.

Let me know if you’ve made any of your own great product, has the process been easy? and did they work? You can comment below or chat to me on twitter @KateL564

Thank you for reading

Kate x

Links

https://www.marieclaire.com/beauty/how-to/a2830/best-homemade-face-masks/ (Cocoa Dream Face-mask)

https://www.superdrug.com/blog/beauty-manuals/make-lip-scrub (Mint Lip Scrub)

https://livingthenourishedlife.com/want-to-get-soft-hands-try-my-homemade/ (Home Made Hand Scrub found on https://livingthenourishedlife.com/ by Elizabeth she offers many DIY recipes for beauty products and her blog is really worth taking a look at)

NARS are upping the foundation game in 2018

Today I’m going to be talking NARS natural radiant long wear foundation … try saying that with a mouth full of Malteasers. Now this is one hyped foundation with many feeling it’s the foundation of the year when we have only just seen the back of January. It is one product I simply had to get my hands on and test, is everything I’ve heard true?

img_1050

Starting with the basics, NARS radiant long wear foundation retails at £35.00 for 1fl 0z. / 30ml which gave me a slight nose bleed but it is NARS so to be expected.

I have to give NARS a big congrats on their shade range as this foundation is available in a massive 33 shades ranging from very light to deep. The shade pictured is “Oslo” (light 1) which is the lightest shade of the range.

“A little advice if your going to order the foundation online and are worried about choosing your shade I used the NARS website to determine my shade and then bought from House of Fraser website as the shipping on NARS was slightly high (I will link both sites below).”

Last thing to note and its a biggie, NARS is promising the foundation has 16 hours worth of wear. Yes you read right 16 hours!!

Upon using I found that this foundation is very thin and liquidy which is very surprising considering the amount of coverage you gain, making it easy to build to the ideal look you want. Two pumps can be used to cover the whole face creating a blank canvass with all natural redness and dark spots covered. (below I have included a photo of the coverage achieved on my tattoo for an example)

img_1049

Due to the texture being so thin it leaves a lightweight feel which I am all for as I do love being full coverage but hate the feeling of being weighed down by foundation.

I have to go back and compliment NARS once again on their shade range! I think this is the closest shade to my natural skin tone I have ever had and for me this is everything as I normally have to use a whitener to tone down other foundation shades. From looking at the whole range available it would be shocking to me if I heard someone was unable to find a shade that was right for them.

Speaking of the shade, once applied it does oxidise ever so slightly, the colour change is barley noticeable so I am not mad at it and I’ve used other foundations where the change has been way more dramatic and I’ve looked like a walking spray tan gone wrong.

The finish is beautiful, giving a smooth complexion and no caking. It is not a full matte product so it doesn’t dry down fully meaning you can actually raise an eyebrow without feeling your face is going to crack into a million pieces.

Saying this I did need to set with powder paying particular attention to my T-Zone area as I get oily here throughout the day, I did feel the foundation would just run off this area if not set right therefore achieving a look I was not going for.

The foundation worked well with other product and stayed in place without being stripped away or caking up throughout liquid concealer application and other powders on top. I was more then satisfied with the performance during the making up stages.

Leading me onto how long this lasts, can this go a full 16 hours??

Honestly I don’t know who would need a foundation on for 16 hours of the day but I do feel if set right with powder you will get a full working day or a night out with a flawless base and no need for touch ups.  The product stays put, stays smooth and gave such a lovely coverage to my face I think its the best my skin has looked, it lasted as long as I needed and has become my go to foundation especially if I have a event, party or special occasion to attend.

Let me know in the comments below if you have tried the NARS natural radiant foundation and your thought. I have heard people say its the foundation of 2018 this early in the year!! I can also be found on twitter @KateL564 so come and join the blog chats and just general discussions.

Thank you for reading.

Kate

Links

https://www.houseoffraser.co.uk/beauty/nars-cosmetics-natural-radiant-longwear-foundation/d870227.pd#286025755,q=nars-foundation

https://narscosmetics.co.uk/on/demandware.store/Sites-UK-Site/en_GB/Home-Show?cm_mmc=SEM-_-Google-_-NRI_G_GBR_TM_EXACT_TM-_-nars&gclid=EAIaIQobChMI2Lzon4y02QIV7LDtCh3Y1ANAEAAYASAAEgInTvD_BwE#pairs